 ------------------------------------------------------------------------------
For full size click the above tag.
------------------------------------------------------------------------------
------------------------------------------------------------------------------
For full size click the above tag.
This tutorial was written with a knowledge of PSP.
Any similarities to any other tutorial are purely accidental and not intentional.
Please do not copy or post on another site without permission.
------------------------------------------------------------------------------
------------------------------------------------------------------------------
Supplies Needed:
Tube of choice: However I am using Lia
Her work is currently FTU - Visit her website HERE
Template: Naughty or Nice Temp by Jenny @ Creative Misfits Blog
Visit there blog - HERE
Kit: Peppermint Wishes by Sarah's Tags n Things
Visit her blog HERE for Purchase detail
Font - Dr Carbfred
------------------------------------------------------------------------------
------------------------------------------------------------------------------
***Remember to save often***
I've had this temp for a pretty long time. So not sure if it's still available or not.
Open temp and Control D to duplicate the image
Change the canvas size to 900 x 900, I like to have a lot of extra room and will re-size later
Now we are going to be deleting a lot from the temp.
Let's delete the following layer: Text background; Text; Snowflakes & Copyright
Activate Rectangle Frame Red
Change Foreground to #b60708 and Background to #e6e6e6
Create Gradient using the following number
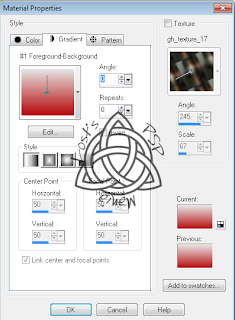
Insert a new layer and flood fill it with gradient you just created
Now delete the Rectangle Frame Red layer
Delete BG Text. There are a couple of ways to create text fills, however my plugins don't work so I made it the old fashion way.
Replace the Naughty n Nice word fill with the Pepper Winter one below

Right click and save this image
Merge layer down so it gets the soft light look
***Remember to save often***
Open paper 6
Activate Right Frame layer, copy and paste Paper 6, invert and delete
Delete Original Right frame layer and merge the new layer to the old layer
Now repeat with Left Frame layer
Open tube of choice.
Copy and paste as a new layer
I re-sized by 75% to get the girl a little smaller.
Activate Right Frame
Copy and paste tube; invert and delete
Change blend mode to screen
Repeat with Left frame, you will have to flip the tube
***Remember to save often***
Now time to add elements of choice
Open element 40
Activate Raster Layer 1 (the one below the pixel text)
Copy and paste as a new layer, invert and delete
Open Element 13, re-size by 50%
Copy and paste as a new layer, use my tag for placement
Open element 15, re-size by 25%
Copy and paste as a new layer, use my tag for placement
Open element 31, re-size by 50%
Copy and paste as a new layer, use my tag for placement
***Remember to save often***
Crop the image around tag. Make sure it's not longer than 650 on the longest side
Now add your copyright
Add anything else you would like
Save image as a png file.
------------------------------------------------------------------------------
------------------------------------------------------------------------------
This tut was written on January 27, 2013
All links were active at time of posting.
I would love to see your finished work.
Email: lostdarkangel13@gmail.com
If any problems arise please contact me, thanks again.
------------------------------------------------------------------------------
------------------------------------------------------------------------------
*************************************************

------------------------------------------------------------------------------
------------------------------------------------------------------------------
This tutorial was written with a knowledge of PSP.
Any similarities to any other tutorial are purely accidental and not intentional.
Please do not copy or post on another site without permission.
------------------------------------------------------------------------------
------------------------------------------------------------------------------
Supplies Needed:
Tube of choice: However I am using Pinup Toons
Please DO NOT use without a proper License
You can find them at CDO HERE
Kit: Ho Ho Ho by Creative Intentionz
Visit her blog HERE for Purchase detail
Font=Bonnet
------------------------------------------------------------------------------
------------------------------------------------------------------------------
Open a blank 800 x 800 canvas, we will re-size later
Open Frame and copy and paste as a new layer
Select the frame layer
Using your magic wand click on the inside of the frame
Selections||Modify||Expand
Use the following settings

Open paper 1
Copy and paste as a new layer, invert & Delete, Select none
Move this layer below the frame layer
Open Mousecone, re-size it by 50%
Copy and paste as a new layer
Use my tag as example of placement
Open Bear, re-size by 50%
Copy and paste as a new layer
Use my tag as example of placement
Select the frame layer
Using your magic wand click on the inside of the frame
Open snowsheet, copy and paste as a new layer
Invert and & Delete, select none
Open Ornamentchain, re-size by 75%
Copy and paste as a new layer, use my tag as placement
Make sure the bear on the box is on a layer above it
Crop image to your satisfaction
Re-size if needed, make sure it's no longer than 650 on the longest side
Add any other elements of your choosing.
I applied a light black Gradient glow instead of a drop shadow
That step is optional
Add Copyright layer
Save as PNG file.
------------------------------------------------------------------------------
------------------------------------------------------------------------------
This tut was written on January 09, 2011
All links were active at time of posting.
I would love to see your finished work.
Email: lostdarkangel13@gmail.com
If any problems arise please contact me, thanks again.
------------------------------------------------------------------------------
------------------------------------------------------------------------------
*************************************************

------------------------------------------------------------------------------
------------------------------------------------------------------------------
This tutorial was written with a knowledge of PSP.
Any similarities to any other tutorial are purely accidental and not intentional.
Please do not copy or post on another site without permission.
------------------------------------------------------------------------------
------------------------------------------------------------------------------
Supplies Needed:
Tube of choice: However I am using Barbara Jensens
Please DO NOT use without a proper License
Visit her site HERE, to purchase
Kit: Holiday Treats by Rieka @ Rieka Rafita
Vist her blog HERE
Font=Pharmacy
------------------------------------------------------------------------------
------------------------------------------------------------------------------
Open Frame 1, shift D to duplicate
Re-size canvas to 800 x 800, will crop it later
Highlight the frame layer then select none
With your magic wand, click in the center of the frame
Now, go to selections, modify, expand
Use the following settings

Open paper 7, copy and paste as a new layer, inverte and delete, select none
Now move this below the frame layer
Select the frame layer, apply a drop shadow using the folling settings

Open tube of choice, place it below the frame layer
Duplicate it and bring copy above frame then hide it
On duplicate layer, erase any part of the tube that is hanging over the frame.
Use my tag as and exapmle, she should be looking as if her legs are the only things hanging out.
Open Teddy Bear, re-size by 50%, copy and paste as a new layer, use my tag as placement
Open Light, re-size by 75%, copy and paste as a new layer, use my tag as placement
Open sparkle 1, mirror, copy and paste as a new layer, use my tag as placement
Open Peppermint 2, re-size by 50%, copy and paste as a new layer, use my tag as placement, make sure it is below the teddy bear and your tube
Open Christmas Ball 2, re-size by25%, copy and paste as a new layer, use my tag as placement
Using a font of choice, I used Infant, type out Holiday Treats
Use my tag as example of placement
Crop image to your preference, re-size so that its no longer than 650 on the longest side
Add any other element of your chosing
Add copyright layer
Save as PNG file
------------------------------------------------------------------------------
------------------------------------------------------------------------------
This tut was written on December 30, 2010
All links were active at time of posting.
I would love to see your finished work.
Email: lostdarkangel13@gmail.com
If any problems arise please contact me, thanks again.
------------------------------------------------------------------------------
------------------------------------------------------------------------------
*************************************************

------------------------------------------------------------------------------
------------------------------------------------------------------------------
This tutorial was written with a knowledge of PSP.
Any similarities to any other tutorial are purely accidental and not intentional.
Please do not copy or post on another site without permission.
------------------------------------------------------------------------------
------------------------------------------------------------------------------
Supplies Needed:
Tube of choice: However I am using Elias Chatzoudis
Please DO NOT use without a proper License
Visit PTE HERE, to purchase
Template: Template 114 by Ali @ Dezigns by Ali
Visit her blog HERE
Kit: University Xmas by Missy @ Scraps with Attitude
Vist her blog HERE for Purchase detail
Font=Pharmacy
Plugins=Gradient Glow
------------------------------------------------------------------------------
------------------------------------------------------------------------------
Open template, shift D to duplicate, close orignial
Delete copyright layer
Re-size canvas to 800 x 800, we will crop and re-size later
Merge the snowflake layers together
Open paper 2
Highlight Raster 2 layer, copy and paste paper as a new layer, invert and delete, select none and merge down
Open paper 1
Highlight Raster 1 layer, copy and paste paper as a new layer, invert and delete, select none and merge down
Highlight Raster 3, flood fill it with a color from paper 1
Apply noise using the following settings

Highlight Raster 4, flood fill it with a color from paper 2
Apply noise using the above settings
Copy and paste tube of choice
Move one till it is on the left side, duplicate tube and mirror
Merge these two layers into one
Open UOX 19, re-size by 75%
Copy and paste as a new layer, use mine as an example
Open UOX 21, re-size by 25%
Copy and paste as a new layer, use mine as an example
Now apply a gradient glow to this layer, using the following settings

Open UOX 61, re-size by 25%
Copy and paste as a new layer, use mine as an example
Duplicate and mirror, merge down
Apply a drop shadow with the following settings

Repeat
Open UOX 72, re-size by 25% and the by 50%
Copy and paste as a new layer, use my tag as an example
Open UOX 13, copy and paste as a new layer
Move this layer to the bottom
Open UOX 33, re-size by 25%
Copy and paste it as a new layer, use my tag as an example of placement
Open UOX 34, re-size by 25%
Copy and paste it as a new layer, use my tag as an example of placement
Add any other element you would like
Add drop shadow anywhere you would like
Crop image and re-size so that it's no larger than 650 on the longest side
Add copyright
Save as PNG file
------------------------------------------------------------------------------
------------------------------------------------------------------------------
This tut was written on December 15, 2010
All links were active at time of posting.
I would love to see your finished work.
Email: lostdarkangel13@gmail.com
If any problems arise please contact me, thanks again.
------------------------------------------------------------------------------
------------------------------------------------------------------------------
*************************************************

------------------------------------------------------------------------------
------------------------------------------------------------------------------
This tutorial was written with a knowledge of PSP.
Any similarities to any other tutorial are purely accidental and not intentional.
Please do not copy or post on another site without permission.
------------------------------------------------------------------------------
------------------------------------------------------------------------------
Supplies Needed:
Template: Template 25 by Yvette @ Essence of Creativity
Looks like her blog is down at the moments
Kit: A Pastel Christmas by Crystal's Creations
Visit her blog HERE for purchase details
Mask: Mask 301 by Vix
I know the mask number but can't find it on her blog.
Visit her blog HERE
Font=LaBrit
Plugins=Fritillary & Gradient Glow
------------------------------------------------------------------------------
------------------------------------------------------------------------------
Open template, shift-D to duplicate, close original
Delete copyright layer, re-size canvas to 800 x 800, we will crop later, I like having a lot of room
Hide background layer
Highlight Small Rectangle Layer
Open Paper 12, copy and paste, invert and delete, select none and merge down
Highlight Large Rectangle Layer
Open Paper 2, copy and paste, invert and delete, select none and merge down
Apply the following noise

Highlight thin rectangle layer
Open Paper 4, copy and paste, invert and delete, select non and merge down
Apply the following Fritillary

Open Santa 3, re-size by 50%
Copy and paste as a new layer, move to the left of the tag
Open Christmas tree, re-size by 25%
Copy and paste as a new layer, move this layer to the bottom layer
Adjust the placement using mine as an example.
Open Sign, re-size by 25%
Copy and paste as a new layer, place this on the right hand of the tag
Use mine as example
Open Flower 1, re-size by 8%
Copy and paste as a new layer, move it to the bottom of the pole
This will help cover any edges where the pole meets the tag temp.
Open Reindeer 1, re-size by 75%
Copy and paste as a new layer, position using my tag as an example
In a font of your choice, type a holiday greeting
For mine I used LaBrit font and typed Happy Holiday
Using a color from my tag as my foreground and black as my background
Now apply a Gradient Glow of choice, but see below for my settings

Now apply a drop shadow, see my settings below

Add a blank new layer as the very bottom layer
Flood fill this with a color from the tag
Apply mask, merge group
Repeat those steps with a different color
Now move the second layer so that the two masks are not on top of each other
Crop you image as you like and re-size making sure it's no larger that 650 on the longest side
Add name and any other item that you would like.
If you do not use a tube, like me please add the following copyright
©Crystal's Creations http://crystalsscrapcreations.blogspot.com/
However if you do, please use the appropriate copyright
Save as a PNG file
------------------------------------------------------------------------------
------------------------------------------------------------------------------
This tut was written on December 06, 2010
All links were active at time of posting.
I would love to see your finished work.
Email: lostdarkangel13@gmail.com
If any problems arise please contact me, thanks again.
------------------------------------------------------------------------------
------------------------------------------------------------------------------
*************************************************
When four of Santa's elves got sick, the trainee elves did not produce toys as fast as the regular ones, and Santa began to feel the Pre-Christmas pressure.
Then Mrs. Claus told Santa her Mother was coming to visit, which stressed Santa even more.
When he went to harness the reindeer, he found that three of them were about to give birth and two others had jumped the fence and were out, Heaven knows where.
Then when he began to load the sleigh, one of the floorboards cracked, the toy bag fell to the ground and all the toys were scattered.
Frustrated, Santa went in the house for a cup of apple cider and a shot of rum. When he went to the cupboard, he discovered the elves had drunk all the cider and hidden the liquor.. In his frustration, he accidentally dropped the cider jug, and it broke into hundreds of little glass pieces all over the kitchen floor. He went to get the broom and found the mice had eaten all the straw off the end of the broom.
Just then the doorbell rang, and an irritated Santa marched to the door, yanked it open, and there stood a little angel with a great big Christmas tree.
The angel said very cheerfully, 'Merry Christmas, Santa. Isn't this a lovely day? I have a beautiful tree for you. Where would you like me to stick it?'
And so began the tradition of the little angel on top of the Christmas tree.
Not a lot of people know this.
*************************************************

------------------------------------------------------------------------------
------------------------------------------------------------------------------
This tutorial was written with a knowledge of PSP.
Any similarities to any other tutorial are purely accidental and not intentional.
Please do not copy or post on another site without permission.
------------------------------------------------------------------------------
------------------------------------------------------------------------------
Supplies Needed:
Tube of choice: However I am using Ismael Rac
Please DO NOT use without a proper License
Visit his store HERE, to purchase
Template: Template 74 by Dezigns by Ali
Visit her blog HERE
Kit: Blue Christmas by Creative Intentionz
Visit her blog HERE for purchase details
Font=Kingthings Christmas
Plugins=Xero Fritillary
------------------------------------------------------------------------------
------------------------------------------------------------------------------
open template, shift-D to duplicate, erase copyright layer,
re-size canvas to 800 x 800, we will re-size later, I like to have plenty of room to work
Highlight the circle layer
Open paper 10, re-size by 60%, copy and paste, invert and delete, select none, merge down
Highlight Frame layer
Flood fill with a dark color, I used a color from Paper 10
Apply noise with the following settings

Apply a drop shadow with the following settings

Repeat Drop Shadow
Click on flake layer, apply a drop shadow with settings above
Open tube of choice and place it on the right side of tag, use my tag as an example of placement
Apply drop shadow using the settings as above, repeat
Open Wordart, re-size by 50%, copy and paste as a new layer, position toward the bottom of the tube
Apply drop shadow using the settings as above, repeat
Open Snowballs, copy and paste as a new layer, move till it is below your tube layer
Apply drop shadow using the settings as above
Open candy cane, re-size by 50%, copy and paste as a new layer, position on the left side of tag, use my tag as an example of placement
Apply drop shadow using the settings as above, repeat
Open Bow 2, re-size by 50%, copy and paste as a new layer, position it toward the bottom of the tag, use my tag as an example of placement
Apply drop shadow using the settings as above
Open Sparkles, re-size by 75%, copy and paste as a new layer just above the circle layer
Change blend mode to Overlay and opacity to 58%
Add any other element you would like
Crop image to your liking, re-size if needed making sure it is no longer than 650 on the longest side
Add copyright information
Save as a PNG file
------------------------------------------------------------------------------
------------------------------------------------------------------------------
This tut was written on November 24, 2010
All links were active at time of posting.
I would love to see your finished work.
Email: lostdarkangel13@gmail.com
If any problems arise please contact me, thanks again.
------------------------------------------------------------------------------
------------------------------------------------------------------------------
*************************************************


