Saturday, October 13, 2012

:||: Happy Halloween - PTU now FTU Kit - TS :||:


Another kit from the Mania!!!
Was PTU but now FTU - ENJOY!!!

Photobucket

This kit is a Halloween kit.
Includes 67 elements & 24 papers.
Drop Shadow on Prv only.
Tagger's Size

Click the preview to download.

--------------------------------------------------
--------------------------------------------------

*************************************************


:||: Fight Like A Girl - PTU now FTU KIT - TS :||:


 Since my first try at PTU didn't work and never actually sold anything, I am making my only 3 PTU kits into Freebies. First one up is my Breast Cancer Awareness kit.

Photobucket

This kit is a Breast Cancer Awareness kit.
Includes 47 elements & 18 papers.
Tagger's Size

Click on preview to download

--------------------------------------------------
--------------------------------------------------


*************************************************


Thursday, September 20, 2012

:||: PTU - Natural Woman :||:

Photobucket
------------------------------------------------------------------------------
------------------------------------------------------------------------------
For full size click the above tag.
This tutorial was written with a knowledge of PSP.
Any similarities to any other tutorial are purely accidental and not intentional.
Please do not copy or post on another site without permission.
------------------------------------------------------------------------------
------------------------------------------------------------------------------
Supplies Needed:


Tube of choice - However I am using Keith Garvey
Please DO NOT use without a proper License
I purchased this tube while he was at MPT, however he now has his own store
Visit his store HERE, to purchase


Template:
Vix Template 18 - Visit her blog HERE


Kit:
Abbey Dawn by Missy
Visit her Store HERE for Puchase detail


Font - Seasons-Spring


Plugins - Xenofex 2 Constellation & Gradient Glow
------------------------------------------------------------------------------
------------------------------------------------------------------------------
Open template, Ctrl D to duplicate temp, close copyright layer

Re-size canvas to 900 x 900, I like having a large workspace, we will re-size smaller later

Open paper 9

Select Background to Colour layer, copy and paste paper 9 as a new layer, invert and delete

Change blend mode to soft light, merge down

Select Circle layer, copy and past paper 9 as a new layer, invert and delete

Change blend mode to Hard light, merge down

Select rectangle layer, flood fill with a color of choice, I used #bd0461

While the layer is still selected, apply Xenofex 2 Constellation

Use the following settings
Photobucket

I chose a tube where the girl kneeling, it gave me the look I was wanting.

Place your tube of choice below the wordart layers

Open 71, copy and paste as a new layer, move this layer to the bottom layer on the canvas

Open 1, re-size by 50%, copy and paste as a new layer, use my tag for placement

Open 27 & 26, re-size both images, now take and copy 26 onto 27

Change 26 blend mode to Dodge and Opticy down to 62, merge the two layers together

Apply Gradient glow using the following setting
Photobucket

Now copy and paste this below wordart layer

Open 25, re-size by 25%, copy and paste as a new layer, use my tag for placement

Open 20, re-size by 25%, copy and paste as a new layer, use my tag for placement

Open 73, re-size by 60%, copy and paste as a new layer,

Duplicate and mirror, Merge the two layers together and send to bottom

Crop image down to size, then re-size so that it's no longer than 650 on the longest size

Add anything else you would like

Now add your copyright

Save image as a png file.
------------------------------------------------------------------------------
------------------------------------------------------------------------------
This tut was written on September 20, 2012
All links were active at time of posting.
I would love to see your finished work.
Email: lostdarkangel13@gmail.com
If any problems arise please contact me, thanks again.
------------------------------------------------------------------------------
------------------------------------------------------------------------------


*************************************************

Friday, July 27, 2012

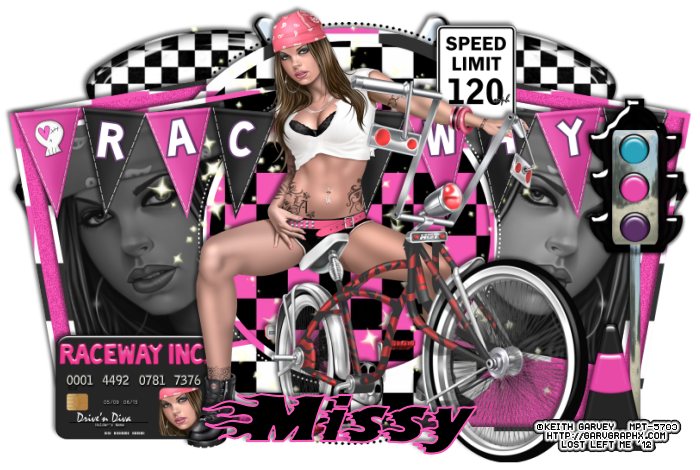
:||: PTU - Racin Girl :||:

Photobucket
------------------------------------------------------------------------------
------------------------------------------------------------------------------
For full size click the above tag.
This tutorial was written with a knowlege of PSP.
Any similarities to any other tutorial are purely accidental and not intentional.
Please do not copy or post on another site without permission.
------------------------------------------------------------------------------
------------------------------------------------------------------------------

Supplies Needed:

Tube of choice: However I am using Keith Garvey, I purchase this tube from MPT.
He is currently at PTE however with their closing he is going independent as of September 1
I will update links when the time comes
Please DO NOT use without a proper License 

Template: Punky Butts Temp 132
Visit her blog = HERE

Kit: Racin Girl Style by Missy @ SWA
Vist her blog HERE for Puchase detail

Font=Blazed

Plugins=Frittllary 
------------------------------------------------------------------------------
------------------------------------------------------------------------------
Open template, Shift D and close orginal

We are going to change the canvas size, I prefer working with a lot of room. We will re-size later.

Go to Image, Canvas size, change it to 900 x 900

Ok, now we are ready.

Remember to save your work as a psd file through out. This will allow you to start back there with the layers in tact if your PSP should close.

Locate and delete the following layers
-Credits
-Wordart - Wicked
-Wordart - Intentions
-Pixel wordart - Wicked Intentions

Highlight the left large square frame layer

Open Paper 10, copy and paste as a new layer, Invert & delete, select none, Delete orginal layer and merge down

Now repeat that with the following layers
-Right large square frame
-Left Rec frame
-Right rec frame
-Large Circle frame
-Left Square frame
-Right Square Frame
-Small circle frame
(You will notice that was all the purple layers)

Open your close up on your tube of choice

Hight the left square layer

Copy and paste your closeup as a new layer, adjust to your preference, invert and delete, select none

Duplicate, Mirror, Merge down

Use my tag as an example

Change blend mode to Luminance (L) and Opacity to 72%

Hightlight small circle layer, copy and paste paper 15, invert and delete, select none, delelte orginal image and merge down

Hightlight large circle layer, copy and paste paper 16, invert and delete, select none, delelte orginal image and merge down

Using a color of choice, I used #f658b5, Flood fill the following layers
-Right Large Square
-Left Large Square
-Right Rec
-Left Red

Now apply Frittllary to the above layers using the below settings

Photobucket

Copy and past tube of choice, position in in the center of tag, use mine as an example

Open Element 31, Shift D to duplicate, close orginal

Using your magic wand tool click inside the wide square

Copy and paste close up of tube of choice, invert and delete, merge down, select none, Resize by 25%

Copy and paste the card below main tube, use mine as an example

Use my tag as an example of the placement on the following elements.

Open Element 8, copy and paste as a new layer

Open Element 70, resize by 15%, copy and paste as a new layer

Open Element 18, resize by 50%, copy and paste as a new layer

Open Element 28, resize by 25%, copy and paste as a new layer

Open Element 23, copy and past as a new layer, move to the bottom layer

Open Element 43, resize by 75%, copy and paste as a new layer

Make sure your main tube layer is at the very top. Rearrange layers if you need to.

Now take a moment and apply a drop shadow to layers of choice, make sure you get at least the frame and tube layers

Add anything else you would like

Re-size total image so that it's no longer than 700 on it's longest side

Now add your copyright

Save image as a png file.
------------------------------------------------------------------------------
------------------------------------------------------------------------------
This tut was written on July 27, 2012
All links were active at time of posting.
I would love to see your finished work. 
Email: lostdarkangel13@gmail.com
If any problems arise please contact me, thanks again.
------------------------------------------------------------------------------
------------------------------------------------------------------------------


*************************************************


Thursday, May 31, 2012

:||: Another Voting Award :||:


I am so please to say that on my birthday, May 29th I received this award.
That is awesome. I have had 300 votes. TY to everyone. :)
   
Photobucket


So now that I have the Pewter award, lets shoot for the Bronze at 1000 votes.
So remember, check back daily to vote. Thanks again everyone.

--------------------------------------------------
--------------------------------------------------


*************************************************
/center>